It contains:

- Shadow of button
- Body of button
- Top highlight
- Bottom scattered highlight
- Download, install and open inkscape. Create a new default document.
- Create a new rectangle inside the working area. Set both corner radius to 10px, Rx = 10px and Ry = 10px. Set dimensions manually: width = 172px and height = 46px. Set (RGBA) fill color to 00000050 and no stroke. Set blur to 1%. This is the shadow of the button:

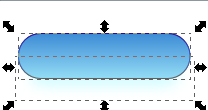
- Duplicate the rectangle (Ctrl + D), and move it 1px upwards. Next, set fill color to vertical gradient from 3d8bd5ff to 94ddf6ff:

- Set stroke color to a 3-point gradient: 2b0a94ff, 3363c4ff, 5d5d5dff:

- All together:

- Next, duplicate button's body, move it away and convert it to path (Ctrl + Shift + C) select the bottom nodes and move them 6 pixels upwards:

- Scale the converted path to about 158 x 18px, non proportional. Set fill color to vertical gradient from (RGBA) ffffffff to ffffffd2. Position the path over the button's body:

- To create the bottom scattered highlight, duplicate the top highlight, mirror it vertically (V), set fill color (RGBA) to cffcffff and position it over the button's body bottom. Thi is the bottom scattered highlight:

- Set blur 15% to the bottom highlight, duplicate the button's body and select both:
- Finally set clip: Menu Object > Clip > Set, and put some text:


